You can export contacts from any service or application into a CSV (Comma-Separated Values) file and import it to Relenta in Settings > Import Contacts.
After the CSV file is uploaded, it will be processed in the background. When completed, you will be able to view the stats on imported and updated contacts.
Create groups & custom fields
If you intend to use custom fields (as well as groups) for your contact records and wish to have them included in the initial contact import you must create the custom fields in the system and edit the CSV file accordingly before you upload your CSV file for import. You can also add ‘tags’ directly to the CSV and the system will automatically create them in Relenta upon import.
This is optional, but it will save you lots of time by not having to manually ‘assign’ each contact one by one later on.
CSV file format
Your CSV file must contain a header row, or first line, that defines the fields in your table.
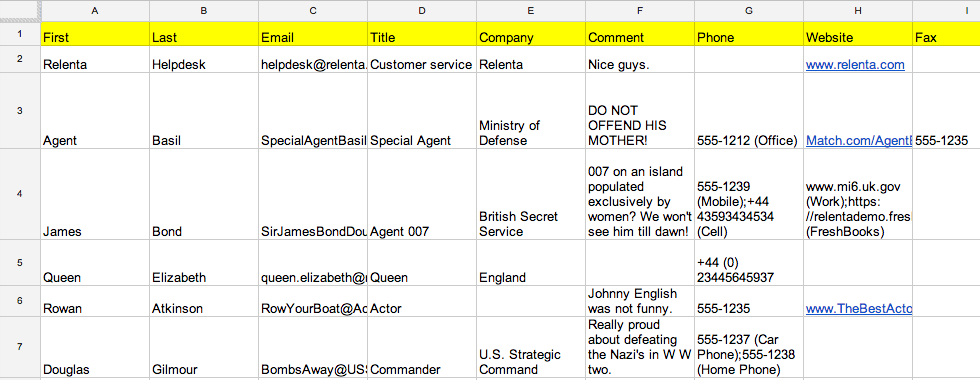
Relenta recognizes headers from the CSV files generated by most popular contact managers, address books or CRMs. Consult their documentation to find out how to export your contacts as a CSV file.
Click to download a CSV file template that you can edit.
To make a custom CSV template directly from your account, first customize your records with any custom fields and groups. Then click on a Group name and click the Export button at the top of the list. It will download a CSV template file with all of the proper column names. (You may have to delete current data before copying and pasting new data into this file.)
Standard headers
Relenta will automatically recognize the following common field names used in many CSV contact file formats:
- First, FirstName, First Name
- Last, LastName, Last Name
- Full Name, Name
- Title, Job Title
- Company, Company Name
- Comments, Comment, Note
- Email, E-mail, Email Address, E-mail Address, Mail, Mail Address
- Twitter, LinkedIn, Facebook
Smart headers
The following fields will be imported along with a label, that is if the column header is “Phone Mobile” and the value is 555-1212, then the number will be imported as field type Phone with value “555-1212” and label “Mobile.” (Note: If a column is named Mobile Phone, either abbreviate it to Mobile or change it to Phone Mobile so that Relenta knows what type of data it is.)
- URL, Site, Web site, Website, Web page
- Phone, Tel, Mobile, Cell
- Fax
- Text
- Messenger, ICQ, AIM, Yahoo, MSN, GTalk, Google Talk, IRC, Skype
- Street, Address, Location, Address Line, City, Region, Province, State, Post Code, Postal, Zip, Country
If your address-related headers have a common prefix, such as HomeStreet, HomeAddress, etc. the prefix, in this example “Home,” will be used as a label.
Groups, tags and custom fields
- Group, Groups, Group Name
- Tag, Tags, Contact Tags
- Custom:custom field name
Multiple group and tag names should be separated by ; (semicolon). For example, in a record where you’d like the contact to appear in both the Client and All Contact groups, enter Client;All Contacts.
Groups and custom fields must already exist in the system before you import contacts. Make sure the group and custom field names in Relenta perfectly match the column heading names in your spreadsheet. Precede custom field names with Custom:, for example, Custom:ID_Number.
If you prepend group name with a minus sign, like so: -Client;-All Contacts, then the contact will be removed from these groups during import.
Tags, if not already present, will be created on the fly during import. Again, multiple tags must be separated by a semicolon (;).
Required fields
Any two of the following three fields must be present for a contact to be imported (or updated) by Relenta: First Name, Last Name, Email.
If your imported file contains Relenta’s contact ID, the above rule doesn’t apply.
If your file contains the Full Name column, then — depending on its format — it will be split into first and last names either as First Last or Last, First.
Updating existing contacts
Relenta uses a smart algorithm in an attempt to make a match between each contacts that is being imported and an existing contact in your Relenta database. This way if you accidentally upload the same file, the contacts aren’t duplicated. The algorithm takes into the account First Name, Last Name and Email and assigns points to each matching field. The contact with highest score is considered to be a match and is updated with imported data. This algorithm doesn’t apply to the duplicate records present in the CSV file itself.
Hint: Use this to your advantage when you need to mass update your records. If you realize that a column was missing from your import or you have a new piece of data for your contacts, re-import the same file with corrected information. It will automatically update all of your records without the need to delete any existing contact records. Make sure to add any new custom fields and/or groups to Relenta before mass updating your records with a CSV import.
Errors uploading your file
If you encounter errors during import, nine times out of ten they are caused by errors in your column header row or incorrect data formatting. If in doubt of the cause of the problem, email your file to us for review.